Wednesday, May 19, 2010

Banana oat muffins


After about three weeks of being MIA I've finally returned with a new recipe. The thing is, I guess it's been pretty busy around here. Spring quarter of college has always been the heaviest load and also the most distracting of all quarters. What is it? The nice weather? maybe. The lack of time because I want to do a million other things? maybe. Quite frankly, it is probably a mixture of both of those things. The funny thing is, I haven't been baking very much in general. I don't know if it's because of the change in weather, but I'm not as hungry all the time, nor do I crave as many decadent sweets as I did a few weeks ago when it was still cold and rainy. Yeah, that must be part of it. There's just something about being cooped up at home and cozying by the warm oven while enjoying a wafting aroma of baked deliciousness.
I guess what I now crave is more fresh air and outdoorsy things-the stuff I couldn't do not too long ago because I was cooped up at home. Regardless, I still have a passion for baking, and that, I know deep within my heart will remain forever. Actually, just last week I baked a cake for my friend, Amber who happens to be stationed in Hawaii right now for a short-term job. Some friends and I threw her a surprise party and I decided to provide the cake. It might appear in my next entry, although the pictures and presentation are a bit below my usual standards. However, the cake does have a special meaning to me. After all,I took the time to carefully carve the edges in hopes that it may somewhat resemble a loaf of bread (Amber love, loves fresh baked bread. It turned out alright, though the frosting did not. This is a side note,but I have yet to successfully make frosting without it going bad in some way.

On to more relevant things, this week's recipe is banana muffins. I actually made these a few weeks ago, on a cold cold afternoon after class. The smell must have been heavenly, because my housemate had a friend over to study, and as he walked in through the door he said, "it smells nice in here!" It really makes me smile when people notice and appreciate the fact that I bake. In some ways I bake for me because its something I thoroughly enjoy and relaxes me, but I would say that the majority of my satisfaction comes from those that try my desserts and tell me how good they are and really show appreciation for the time and effort mixed and baked into them. I must say, as modestly as I can possibly make it sound here on my blog *wink* that he ate 2 muffins with a smile and a twinkle in his eye and probably would have asked for another if had he not felt the need to be polite. These muffins turned out really great. I tried adding a topping and was surprised at how simply adding brown sugar and oats could give the muffins that extra kick of umph. Hopefully you can bake these muffins up on a cold day when you're all cooped at home, like I did. But by all means, bake these in the dead heat of summer. They will taste good either way.

As adapted by Abi Godfrey on allrecipes.com
RECIPE:
Ingredients:
1 1/2 cups all-purpose flour
1 teaspoon baking powder
1 teaspoon baking soda
1/2 teaspoon salt
3 large bananas, mashed
3/4 cup white sugar
1 egg
1/3 cup butter, melted

Directions:
1. Preheat oven to 350 degrees F (175 degrees C). Coat muffin pans with non-stick spray, or use paper liners. Sift together the flour, baking powder, baking soda, and salt; set aside.
2. Combine bananas, sugar, egg, and melted butter in a large bowl. Fold in flour mixture, and mix until smooth. Scoop into muffin pans.
3. Bake in preheated oven. Bake mini muffins for 10 to 15 minutes, and large muffins for 25 to 30 minutes. Muffins will spring back when lightly tapped.

Note: I substituted honey for about half of the called for white sugar. I then lowered the baking temperature by 25 degrees because of the honey. I also added a mixture containing about a 1/4 cup of brown sugar and 1/4 quick-cooking oats to the muffins about halfway through the cooking time.

Friday, April 30, 2010

viva peru! peruvian alfajores


This particular recipe comes form one of my best friends who is, indeed, Peruvian. We met in high school and from the beginning, I was welcomed into the wonderful world of the Peruvian culture. The door to her house was always open to me-something I had never experienced until I met her.The food, the music, the friendly embrace from her mother, and greetings of welcoming in Spanish from both parents; these are all things I enjoy. Myself, being a less-cultured-than-typical Japanese American have always enjoyed having friends of various cultures. My friends come from mainly first or second generations, have much knowledge of their mother countries, parents that gave up so much to bring them here, and have I mentioned, great food? If I had to pick my favorite perk of possessing culturally-rich friends, I would have to say it's the food. (I do value the actual friendship, I swear). There is something so admirable in a house that is always smelling of cooked food that has been skillfully prepared and passed down from previous generations.

Inevitably, I love Peruvian food and dishes like ceviche, lomo saltado, and causa rellena. My mouth is watering at the thought of these dishes, though with a pang of sadness-because I realize Angie friend now lives 2000 miles away-I realize I cannot enjoy these homecooked dishes like I once could.
I planned to follow a recipe for alfajores so that I could send them to Angie in time for her birthday. I have eaten them before and believe me, they are like heaven in cookie form. Although they are excellent when bought, I just wanted to see if I could come close-through my own handiwork-to the real thing. Alfajores, I realize I have yet to describe for those who aren't familiar with them, are South American cookies that-though there are many variations-usually consist of manjar blanco (a caramel-like confection) between two soft shortbread cookies. Yum, right?
Because I am not near any hispanic markets I had to find a substitute for the manjar blanco, the best being dulce de leche. This can be made by boiling sweetened condensed milk for 3-4 hours. directions are here. use the 'in the can' method

I found a recipe for Peruvian alfajores on a site called christmas-cookies.com and was pleasantly surprised at the results. The cookies were reminiscent of the authentic version, but sadly, and quite as anticipated, the filling did not remotely taste like the real thing. However, it is a good cookie, and for now, I will have to sell this recipe based on its spitting image of what alfajores should look like. This is one of those times that seeing but not tasting the food in the pictures serves to my benefit. hehe. But anyways, like I said, this is a perfectly good cookie that I would enjoy baking again. Maybe I'll call it the Japanese American version of alfajores to add to the collection of Argentinian and Peruvian ones. Maybe? eh, I guess not. But they are good. Okay, I'll stop, it's getting late and my mind is running in circles. Can't seem to write a single coherent sentence without struggling. So here's the recipe and enjoy. :)

As adapted on Christmas-cookies.com
RECIPE
Makes about 24

For the cookies:
1-1/2 cups unsalted butter
1 cup confectioners' sugar
2 tablespoons granulated sugar
1/4 teaspoon salt
1/4 teaspoon almond extract
1/2 teaspoon vanilla extract
1/3 cup ground almonds (can be ground in a food processor)
3 cups unbleached all-purpose flour

For the filling:
2 cups firmly packed brown sugar
1 cup half & half or light cream or evaporated milk
3 tablespoons unsalted butter
1/2 teaspoon vanilla extract

To make the cookies:
Cream the butter with the powdered sugar until fluffy. Stir in salt, extracts, ground almonds and flour. Wrap and chill 30 minutes. (If you chill longer, you have to let the dough warm up a bit before it can be rolled. Or, do what professional pastry chefs do: whack it with a rolling pin until it becomes more malleable).

Mealwhile, make the filling:
In a medium saucepan, heat brown sugar with cream over medium heat. As it cooks, brush inner sides of pan with a pastry brush dipped in cold water. This wipes away grainy sugar crystals. Heat until mixture reaches soft ball stage (238-240 F). Remove from heat - let cool to about 110 F. Stir in the butter and beat until mixture is thickened. Add vanilla. (Heat to loosen or add additional cream). If mixture is too thin, add in confectioners' sugar.

To bake the cookies:
Roll out dough 1/4 inch thick. Cut in 2-1/2-inch circles. Bake on a parchment-lined baking sheet at 350 F for 12-14 minutes. Cool baking sheets
between batches. Cool cookies on wire racks.

To assemble Alfajores:
Spread some caramel filling on a cookie. Top
with another cookie and press together nicely. Be careful, these are fragile. Dust tops with confectioner's sugar.

Note: I substituted the condensed milk for the filling. Recipe makes 24 sandwich cookies if using a 2-inch cookie cutter.

Sunday, April 18, 2010

Oatmeal Peanut Butter Cookies


I love love peanut butter. I would eat it every meal of the day if I could-if it weren't so bad for the waistband. Peanut butter is good by itself on a spoon, but pairing it with the perfect match makes it even better. For instance, with jelly -duh- or bananas in a sandwich, oh, and with chocolate. Can't forget chocolate. Marrying peanut butter with something sweet really brings out its salty and creamy yumminess. I had never tried mixing oatmeal with peanut butter, so when I found this recipe for oatmeal peanut butter cookies I knew I wanted to try it. Plus, while I was at target I came across a bag of Reese's peanut butter chips. I thought they would be the perfect addition to the cookies. Can't ever have too much peanut butter.
Truthfully, this cookie is more of a peanut butter cookie with oatmeal mixed in. But the oatmeal did make the cookie different from typical peanut butter cookies, which tend to be on the dry side. These cookies were definitely moist and less dense. They looked like oatmeal cookies when they came out, too!
The peanut butter chips added that kick, so that every bite is a double peanut butter experience. Yum. If you like peanut butter you will love these cookies.
I wish I hadn't made only half of the recipe after all; these disappear fast.


As adapted byMichele on allrecipes.com
RECIPE
Ingredients:
1/2 cup shortening
1/2 cup margarine, softened
1 cup packed brown sugar
3/4 cup white sugar
1 cup peanut butter
2 eggs
1 1/2 cups all-purpose flour
2 teaspoons baking soda
1 teaspoon salt
1 cup quick-cooking oats

Directions:
1. Preheat oven to 350 degrees F (175 degrees C).
2. In a large bowl, cream together shortening, margarine, brown sugar, white sugar, and peanut butter until smooth. Beat in the eggs one at a time until well blended. Combine the flour, baking soda, and salt; stir into the creamed mixture. Mix in the oats until just combined. Drop by teaspoonfuls onto ungreased cookie sheets.
3. Bake for 10 to 15 minutes in the preheated oven, or until just light brown. Don't over-bake. Cool and store in an airtight container.

Note: I substituted butter for both the margarine and shortening. I also substituted honey for a third of the called for white sugar. I added 1 cup of peanut butter chips and also 1/2 cup walnuts for added texture.

Monday, April 12, 2010

Blondies, my match made in heaven?


Sometimes my lack of knowledge in the baking world seems more evident than other times. After all, I'm a new blogger since one month ago. Not too long ago my baking consisted of boxed Pillsbury brownies and Betty Crocker cake mixes. I have since come a long way, having made my first cake by scratch (at one time I thought that day would never come).
The last time I was in Hawaii visiting family, my uncle, well aware of my meager ability in the baking and cooking world, bought 5 of those pre-made, pre-portioned packaged Tollhouse cookie dough. Well, sadly, that was my capability level at the time. I could barely preheat an oven, let alone juggle simple directions to bake cookies and correctly distinguish done cookies from un-done ones. Yes, I have traversed quite a bit of ground since then, but my trail guide (to keep with this analogy) has not yet come to any steep climbs, hence, no scenic views just yet. I did, however, come across a recipe, intriguing to me, but not necessarily to others, (a mere roadside vista point, if you will, seen by many others, but not yet by me). This week's recipes happens to be a recipe for Blondies. Unbeknown to me not too long ago, blondies had an inevitable fate on my list of "must bake these."
A brownie without the chocolate is essentially what it is, and this variation on something so pedestrian, like the brownie, intrigued me. The more I read about it, the more I yearned to put this moist, buttery, complexion-less cousin of the brownie to my lips. Plus, it was easy to find great recipes. I only had to go as far as my favorite baking blogs to find the perfect one. Cookie Baker Lynn takes the recipe to a whole new level with maple cream sandwich cookies added to the batter. I just couldn't pass this one up and had to try it. Only problem was, I didn't have the cookies, but I did have some vanilla creme-filled cookies in my pantry. Sometimes baking calls for substitutions!

I was on one of my rampages late last Monday night. I knew that if I didn't put any baked sweet in my mouth soon, I would go crazy. Thank goodness for my roomate's suggestion to make these because had I not, I would have further delayed the discovery of one heavenly experience for my taste buds!
Baking these blond brownies was a blast. Maybe part of the fun came from the mere anticipation of a sweet thing for my tummy, but I kid you not, making them was at least half of it. I think it's because there are many elements that make up the whole process: the melting and simmering of the butter (the smell made my insides warm and my taste buds dance), the chopping of walnuts and creme-filled cookies and battling the burning desire to eat a few bites.
And that's not to mention the beauty of the batter, which only foreshadows the end result. It's just the perfect shade of tan-the color on a roasted-by-fire marshmallow of the place where the white meets the burnt-a creamy mocha color, perhaps. Anyways, it's beautiful.

I warn you that when you put your pan of blondie batter into the oven, you will not be able to leave the kitchen, because those 15 minutes of bake time that you would normally use to 'get something done' will be spent right there, in front of your oven, waiting. If it's the wafting smell of the batter components working their magic, or the burning anticipation of tasting it, I'm not sure, but regardless, your eyes will be glued to that oven and your feet firmly planted on that linoleum floor. These Blondies will be your destiny, at least for the next 15 minutes of your life, because nothing else but to wait for these blondies could possibly make any better use of your time.
Baking has its lessons, and one that I've learned to embrace, is the lesson of patience. A virtue of life and especially in the life of one who bakes, patience has a lot riding on it. I have learned to wait until a cookie cools, abstaining from a cookie right form the oven that will only crumble in my hand and burn the insides of my mouth. Patience is indeed important and holds true for this recipe. The blondies need to cool almost completely so as to give them adequate time to settle and condense properly. Also, I found the taste is much more present when cooled.
So when you have awaited the allotted time, and if you cannot, I'm sure you'll enjoy what you taste, if you are like me, you will have an oh-my-goodness-this-is-amazing! moment. I have honestly never tasted anything so satisfying by the bite. If baked goods were rated on their quality of taste over the quantity, this hands down would win in my books. I'm telling you, rarely can I taste something so good and be able to eat only a snippet of it. With so much goodness packed into such a small area, I was indeed elated after the first bite. Yum! The crushed cookies added some sort of airiness to the mostly dense texture and the nuts added that wholesome feel. The surrounding areas around those bits of cookies and walnuts were pure heaven. That's the best explanation I can give. It was buttery, soft, chewy-all in one. I enjoyed them and they were the easiest thing to finish I have baked so far. So bake these, whether they are uncharted or much traversed territory to you. I promise, you will like what you taste.

As adapted by Cookie Baker Lynn
RECIPE:

Ingredients:
1-1/4 cups (2-1/2 sticks) unsalted butter
2-1/4 cups all-purpose flour
1-1/2 tsp baking powder
1-1/2 tsp salt
2 cups packed light brown sugar
1/2 cup granulated sugar
3 large eggs
2-1/2 tsp pure vanilla extract
10 oz roughly chopped Maple Cream-filled Cookies (about 12 cookies)
1 cup chopped walnuts (optional)

1- Preheat oven to 350 deg. F. Line a 9 x 13-inch pan with aluminum foil, leaving foil hanging over all the edges. Butter the foil and dust with flour.

2- In a saucepan over medium heat, cook the butter until it turns golden brown. It will bubble and froth up, then subside. Remove from heat and set it aside to cool.

3- Whisk together the flour, baking powder, and salt.

4- In the bowl of an electric mixer, combine browned butter and both sugars; stir with a wooden spoon until combined. Attach bowl to mixer and add eggs. Using the paddle attachment, beat on medium-high speed until light and fluffy, about 3 minutes. Add the vanilla and beat to combine. Add the flour mixture, stirring till combined, then gently stir in the chopped cookie bit and the walnuts. Pour into the prepared pan, smoothing the top with a spatula.

5- Bake until a cake tester inserted into the center comes out clean, 35 to 40 minutes (do not overbake!). Transfer to a wire rack to cool completely. Using the foil overlap as handles, take the blondies out of the pan and transfer to a cutting board. Cut the blondies into squares.

Saturday, April 3, 2010

Lemon Bars

Blogging about baking yummy confections has definitely got its perks. For instance, there are always sweet goods around my house, which means coming home from a full day of classes and work is extra nice. However, I thought it would be hard. I thought I would eventually run out of recipes to make. Well, I was wrong. In fact I have so far accumulated a long list of recipes I want to try, an array of different things, bars, cakes, muffins. All the time I've spent searching for that perfect lemon bar recipe, which I will tell you about soon,and countless others, I've realized something: that my main meals (breakfast, lunch, dinner) have gone down the wayside. I've grown accustomed to making big batches of stews or chili and then eating them for 2 weeks though I'll throw in the occasional omelet or sandwich to keep things from getting too predictable. More attention needs to be given to that part of my diet, for sure, but that doesn't mean I'll have to focus less on dessert-I'll just have to find a balance.
As a request I am paying return to (my dad's), I made lemon bars. There are so many recipes out there, so I basically found a bunch, closed my eyes, and picked one. This one happens to be from a fellow baking blogger, Cookie Madness.

I have baked lemon bars before and there are a couple things I noticed each time I made them, including this time. They always have unattractive white splotches across the tops. I guess they always have that ominous powdered sugar dusted topping for a reason. If you must hide your dessert's imperfections, by all means, do it.

I will keep this recipe and use it again, for sure. I was presently surprised to see that the filling had not seeped into the crust when I pulled it out of the oven. The filling had the right tartness although I would even add more lemon juice than the recipe calls for. The crust was buttery and flaky, simply perfect.I recommend waiting until the bars are completely cooled to cut them as so they don't crumble.

Also, wait until they are cool to dust them with sugar. However, the powdered sugar never seems to linger very long. Just long enough for me to take some photographs and the sugar accomplishes a disappearing act. (can anyone tell me how to make the powdered sugar stay a little longer?)
As adapted by Cookie Madness
RECIPE:
Crust:
3/4 cup plus 2 tablespoons all-purpose flour (114 grams)
1/3 cup powdered sugar — plus extra for garnishing
2 tablespoons cornstarch
3/8 teaspoon salt (just use ¼ tsp plus an extra pinch)
6 tablespoons unsalted butter, cut into pieces

Filling:
2 large eggs
2/3 cup granulated sugar
1 1/2 tablespoons all-purpose flour
1 teaspoon lemon zest
1/3 cup fresh lemon juice
3 tablespoons half & half (tbsp marg + enough milk)
1/8 teaspoon salt
Don’t preheat oven quite yet. Line an 8 inch square metal pan with foil. Spray the foil with cooking spray
Pulse flour, powdered sugar, cornstarch, and salt in food processor. Add butter and process to blend, 8 to 10 seconds, then pulse until coarse. Pour what will seem like a very *dry* mixture into lined pan and press over pan bottom. Refrigerate for 30 minutes. While it chills, you can make the filling.
Preheat oven to 350 degrees F. When oven is preheated, bake the pre-chilled crust (above) for 18-20 minutes or until edges are very lightly browned.
Filling: Lightly beat the eggs, sugar, and flour together in a bowl. I used a fork. Add lemon juice, lemon zest, half and half, and salt and mix well.
Reduce oven temperature to 325 degrees. Stir filling again, then pour filling over **warm** crust. Bake for 20 minutes or until filling no longer appears wet and shaky.
Set on a wire rack and cool to room temperature. Lift from pan, place on cutting board, dust with extra powdered sugar and cut into bars.
Cut into a dozen squares
Note: if you don't have half and half add enough milk to one tablespoon margarine or butter to get one cup. I don't have a food processor so I mixed the flour, sugar, and butter with a metal whisk.

Thursday, March 25, 2010

Ba-na-na-na-na Cake


I was going to wait a whole week before I went ahead and wrote my next post, but as a new "blogger" I simply couldn't put off my excitement. I always thought that I would stick to cookies when baking, but I've found that to leave all the other categories of decadent desserts out would be a baking sin. Baking is humdrum when there is only one genre to choose from. Therefore, I decided to break my cookie focus, and begin an adventure into "uncharted territory" with this recipe for Banana Cake. The title, I assure you, is not a typo. I know how to spell "Banana" but I couldn't resist reference to comedian, Demetri Martin's one-liner, and this is how it goes.
"It makes me feel stupid whenever I try to write the word 'banana,' because I don't know when to end it. It's like how many '-na's' are on this thing? Because it's like bana, keep going, bananana, damn!"

Tangent set aside, I love bananas. It wasn't always so, but along with a lot of other things that I no longer hate but love, the banana has taught me that tastes change. Or perhaps it was a texture-thing in the case of the banana. Anyways, I love it now and that's exactly why I am posting this recipe. Gosh, it's one of those distraction-prone days, I think.

This recipe is a very good one. I found it on allrecipes.com. If you aren't already familiar with the site, I'm telling you, it's amazingly useful. I utilize it to find the perfect recipe because you can further narrow your search by relevance and rating. I could ramble on about the wonderful features of allrecipes, but then you would miss out on the encore presentation that is my banana cake, and why exactly I decided to post it! So it all started with some overripe bananas, gosh, how does that even happen when I love them as I do? Well it did, as simple as that sounds, and I looked up banana recipes when I realized I couldn't eat them as fast as they were ripening. Truth is, I don't much like bananas once they've entered that brown-spotted stage-it's all about the firm, barely ripe phase.
Though a much lighter version than banana bread, I feel that this recipe does not pail in taste to its bread counterpart. Bake this cake, and you might never go back to making banana bread again!
As adapted by Carol on allrecipes.com
RECIPE:
Ingredients:
3/4 cup butter (or margarine works too)
1 1/2 cups white sugar
3 eggs
1 teaspoon vanilla extract
3/4 cup sour milk
1 cup mashed bananas
2 1/2 cups all-purpose flour
1/2 teaspoon salt
1/2 teaspoon baking soda
1 teaspoon baking powder

Directions:
1. In a large bowl, mix together butter or margarine, sugar, eggs and vanilla. Set aside.
2. In another bowl, sift together flour, salt, soda, and baking powder. Add these dry ingredients to the creamed mixture. Add sour milk and bananas to the batter. Beat together well.
3. Line two 9 inch round cake pans, or one 9 x 13 inch pan with wax paper; the pans can be greased and floured instead, if desired. Bake at 350 degrees F (175 degrees C) for 17 to 20 minutes for the layered cakes, or for 25 to 40 minutes for the sheet cake.

Note: I baked the recipe as is using 2-9 inch round baking pans. To make your own buttermilk (aka sour milk): mix 2 tablespoons white vinegar per every cup of milk, and let sit for 15 minutes or until it begins to curdle. I did not make my own frosting for this recipe, but I recommend a cream cheese frosting.

Saturday, March 20, 2010

Ginger Snaps


First post! I'm giddy with excitement about what tumultuous fanfair this is starting.
I thought this was the perfect recipe to start with. After all, it was the first time I felt completely smitten with a recipe. I found the recipe off of allrecipes.com. I tend to use that site as a source for many of my recipes. You may think of ginger snaps as a holiday kind of cookie but I disagree. This cookie deserves more recognition than it gets and has become my personal every-day-kind-of-cookie. Take that chocolate chip! There's just something wonderfully wholesome about the mixture of spices-cinnamon, cloves, ginger-that makes this cookie special. This recipe is a keeper and is one I feel does not need to be tweeked in any way. The recipe is taken verbatim from allrecipes except for the honey. I added honey (thanks to my dad's beekeeping hobby) although the recipe calls for molasses. I researched that honey can be substituted cup for cup for molasses. I have made the recipe with molasses and I personally don't like the taste. I love this recipe...this is my new go-to cookie.

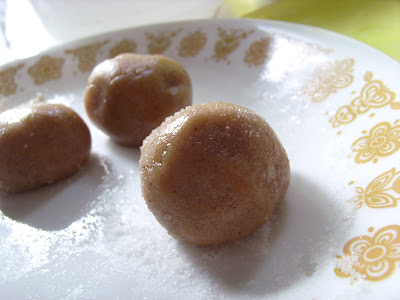
rolled dough, coated in sugar and ready for the oven

As adapted by Elaine on allrecipes.com
RECIPE:
Ingredients:
1 cup packed brown sugar
3/4 cup vegetable oil
1/4 cup molasses (pure honey)
1 egg
2 cups all-purpose flour
2 tsp. baking soda
1/4 tsp. salt
1/2 tsp. ground cloves
1 tsp. ground cinnamon
1 tsp. ground ginger
1/3 cup granulated sugar for decoration

directions:
  1. Preheat oven to 375 degrees F (190 degrees C).
  2. In a large bowl, mix together the brown sugar, oil, molasses, and egg. Combine the flour, baking soda, salt, cloves, cinnamon, and ginger; stir into the molasses mixture. Roll dough into 1 1/4 inch balls. Roll each ball in white sugar before placing 2 inches apart on ungreased cookie sheets.
  3. Bake for 10 to 12 minutes in preheated oven, or until center is firm. Cool on wire racks.

Note: I rolled the dough into 1 1/2 inch balls. I baked them at 300 degrees for 15 minutes for a crispy cookie, and 13 minutes for a chewier cookie.